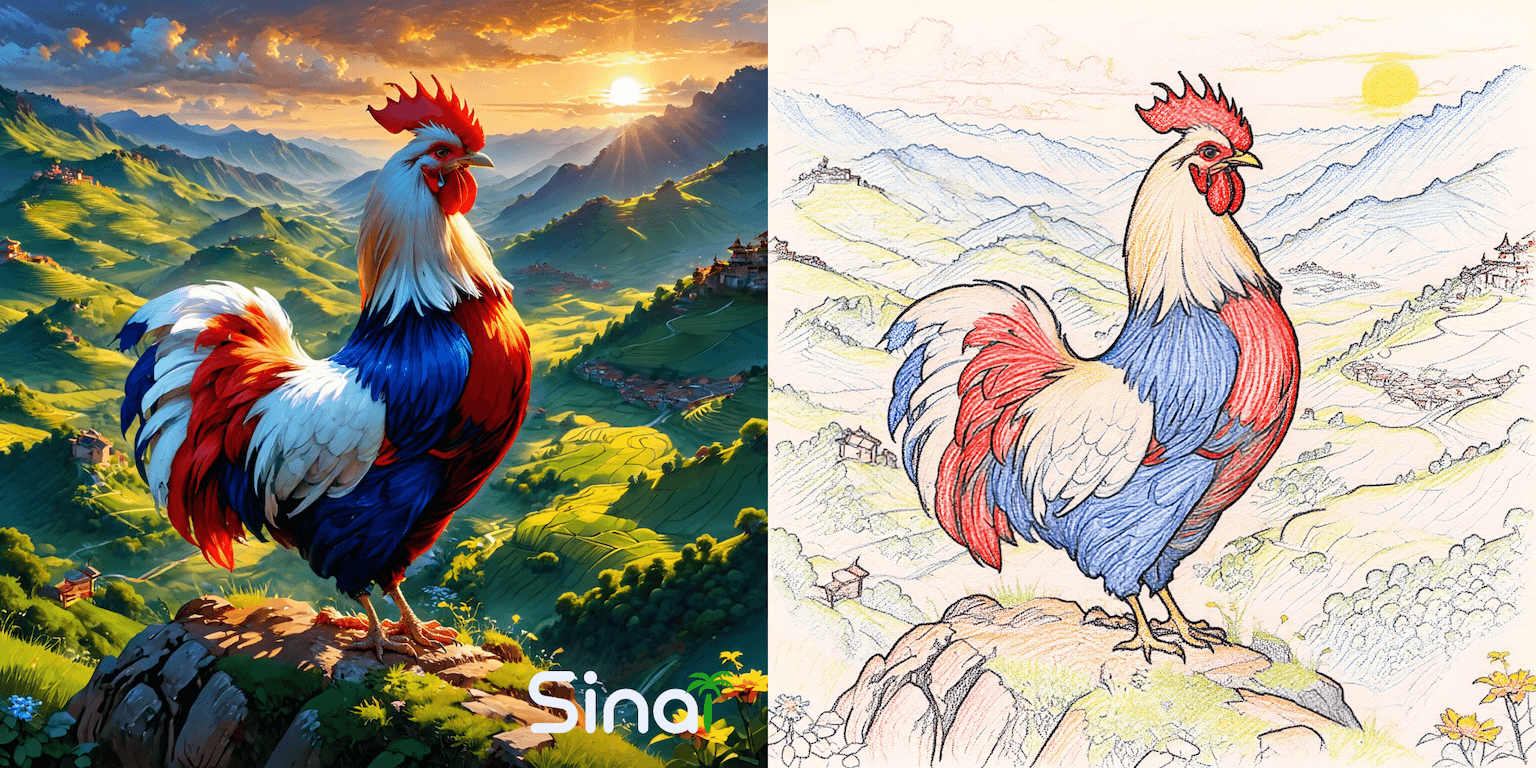
Introduction: from photo to pencil, ink, or comic—on your phone
Want a pencil sketch, ink line art, or comic/manga look from an ordinary photo? This guide shows you the fastest way to turn a photo into a drawing on iPhone or Android using Sinaï Studio. You’ll get copy-and-paste prompts, a repeatable workflow, and pro tips to keep lines crisp and shading natural—plus manual alternatives if you prefer a no-AI route.
Key takeaways
- Three styles that rank: Pencil sketch, ink/line art, and comic/manga cover the most searched drawing effects.
- AI first, manual when needed: Start with Image-to-Image for the heavy lift, then polish with Inpainting and the Detailer.
- Mobile & free to start: Works on iOS and Android; get 25 free generations or edits per day to experiment before upgrading.
Popular styles & prompt starters
Pencil sketch (graphite look)
Prompt: Convert this photo into a clean pencil sketch with fine graphite lines, soft cross-hatching, subtle paper grain, natural proportions, balanced contrast.
Tip: Keep style strength moderate to avoid smudging; enhance edges later with the Detailer.
Ink / line art (black & white)
Prompt: Turn this image into bold black ink line art with clear outlines, varied line weight, minimal shading, crisp contours, white background.
Tip: Ask for “line weight variation” for a hand-drawn feel.
Comic / manga
Prompt: Transform this photo into a comic/manga drawing with clean ink outlines, cel shading, halftone screen tones, strong highlights, panel-ready composition.
Tip: Add SceneShift later to place your subject on a panel or textured paper.
Step-by-step in Sinaï Studio (AI workflow)
- Import your photo. Open Sinaï Studio and add the image (share from your gallery or tap the camera icon inside the app).
- Open Image-to-Image Edit. Tap Edit (the Image-to-Image button) beneath the image.
- Paste a style prompt. Use one of the recipes above; optionally include paper grain, line weight, or halftone details.
- Adjust generation settings. Tap the white settings button (top-right) to set resolution, number of variations (1–4), and style strength. Start mid-strength for control.
- Generate & review. Save your best result to the Studio; keep one or two alternates for reference.
Refine the drawing
- 🖌️ Inpainting: Paint over areas that need line cleanup or extra hatching (e.g., hair or clothing folds). Prompt: “clean contour lines, add subtle cross-hatching, keep proportions natural.”
- 🔍 Detailer: Brush along key edges (eyes, jawline, silhouette) to sharpen lines without affecting the full canvas.
- ✨ Style Transfer: If you have a reference sketch, apply its look to your result for consistent line quality and texture.
- 🖼️ Background Removal → 🔄 SceneShift: Extract the subject to transparent PNG, then place it on paper texture, comic panels, or a clean white background.
- 🔠 HD Upscale: Upscale before export to keep pencil strokes and halftone dots crisp.
Full Sinaï Studio tool guide (quick reference)
- 🖌️ Inpainting — Add or tweak lines, hatching, or small props with a brush mask.
- 🩹 Object Removal (Eraser) — Remove unwanted background clutter before stylizing.
- 🖼️ Background Removal — Cut to transparent for print/layouts.
- 🔠 Image Upscaling (HD) — Preserve line fidelity for large exports.
- 🙂 FaceBlend — Keep character likeness when stylizing portraits.
- ✨ Style Transfer — Match a sample sketch’s texture and line weight.
- 🔍 Detailer — Sharpen edges and micro-details locally.
- 🖼️➡️ Edit (Image-to-Image) — The main drawing conversion engine.
- 🔄 SceneShift — Put your drawing on paper, panels, or a stylized backdrop.
- 💾 Save — Store versions in the Studio for A/B testing.
Manual methods (no-AI alternatives)
If you prefer a manual route, you can create a drawing effect using free tools:
- Snapseed (mobile): Desaturate → Tune Image (increase contrast) → Details (structure) → Curves (S-curve). Use Brush to lighten highlights; export.
- GIMP / Photopea (desktop/web): Duplicate layer → Desaturate → Find Edges / Edge-Detect → Invert → Levels for crisp lines → (Optional) add paper texture on top (Multiply/Overlay).
These mimic pencil/ink, but the AI workflow above is faster and more flexible when you need specific styles (manga, halftone, watercolor pencil).
Troubleshooting & pro tips
- Lines look mushy: Lower style intensity, rerun, then use Detailer along contours. Upscale before export.
- Faces distort: Use FaceBlend with a clear reference; keep prompts focused on style, not anatomy changes.
- Comic tones too heavy: Ask for “light halftone,” “thin screen tones,” or “minimal cross-hatching.”
- Paper texture too strong: Place texture via SceneShift and reduce intensity in the prompt (“subtle paper grain”).
FAQ
Can I do pencil, ink, and comic from the same photo?
Yes—duplicate the project and run separate Image-to-Image prompts for each style. Save all three for A/B testing.
Does this work on both iPhone and Android?
Absolutely. Download Sinaï Studio from the App Store or Google Play and follow the same steps.
Is there a watermark?
No—Sinaï Studio does not add a watermark to your results.
Conclusion
Turning a photo into a drawing is straightforward when you combine Image-to-Image generation with a few targeted refinements. Whether you want a delicate pencil sketch, bold ink line art, or a comic/manga frame, Sinaï Studio gives you a fast, mobile workflow—and 25 free edits per day to practice until your style clicks.
How to Use the Features Available in Sinaï Studio
1. Create a New Image from a Prompt
Type your prompt and press Send. The AI generates an image based on your description.
2. Modify an Existing Image
Import an image (share from gallery or tap the camera icon). Once it’s in a project, the editing buttons appear beneath it.
3. Editing Buttons and What They Do
- 🖌️ Inpainting — Add/modify elements by brushing the area.
- 🩹 Object Removal (Eraser) — Erase unwanted parts.
- 🖼️ Background Removal — Remove background.
- 🔠 Image Upscaling (HD) — Higher-resolution output.
- 🙂 FaceBlend — Keep or insert a face.
- ✨ Style Transfer — Apply one image’s style to another.
- 🔍 Detailer — Refine details inside a selection.
- 🖼️➡️ Edit (Image-to-Image) — Generate a new variation from the current image using a prompt.
- 🔄 SceneShift — Change/replace the background or environment.
- 💾 Save — Save to your Studio gallery.
4. Using Each Editing Tool
Select a tool, choose the image, then:
- Eraser / Inpainting — draw over the target area.
- Detailer — brush the zone you want sharper or cleaner.
If unsure, try Image-to-Image first; it can achieve most effects with a specific prompt.
Example: Add “cross-hatching” to a pencil portrait
Method 1 — Image-to-Image: Import → Edit → prompt: “add subtle cross-hatching shadows, keep proportions and edges crisp.”
Method 2 — Inpainting: Import → Inpainting → mask cheeks and jaw → confirm → prompt: “apply light cross-hatching shading, pencil texture, natural skin contours.”
5. Generation Parameters Page
Tap the white button (top-right) to set output resolution, number of images, and style intensity.